Total Pageviews

Showing posts with label nails inc. Show all posts

Monday, 6 February 2012

Water Marble Effect Nail Art

Hello everyone :)

I have been considering trying out water marble nails for ages, but the process seemed so messy and time consuming that Ive always put it off - But today, I jumped straight in and gave it ago. (But I was right, its very messy and very time consuming!)

Before starting, you will need to choose at least 2-3 of your favourite nail polish colours. I went for red (nails inc), pink (accessorize) and purple (barry m), and give your nails a good base colour, I choose white as it helps the other colours stand out more.

Fill a bowl with room temperature water. It cant be too hot or too cold as it effects the way the polish reacts, so make sure this right before you proceed. You really dont want to have to start all over again!

An important tip is to cover all around your nails with tape. This ensures that they dont get covered in nail polish (and believe me they will!) and that you spend hours trying to clean them up.


Heres the fun part - Add little droplets of your polish into the water, one by one, mixing and matching with the colours.


Using a toothpick, gently pull from the middle of the circle dragging outwards. The outta edges of the polish is already dry (strange that the polish is dry while in water, but it is!) so make sure you always drag from the middle.

You can create whatever design you fancy!


Insert your fingers into the bowl, one by one and leave for about 30 seconds. With the toothpick collect the rest of the polish around the finger and then gently remove your finger from the bowl...


As you can see from the above picture, it really is a messy process, as this needs to be repeated for each nail, so will take up some time.

Once all nails are done, they should turn out something like this (probably completely different, but you get the jist!) My little finger went abit wrong :( but over-all Im pretty pleased with them.

left hand

right hand
I have found this design tricky but the good thing is, there is no right or wrong way. It is however, time consuming and messy so its a design that you would only want to do now and again, so unfortunatly not practical.

I love the fact that every time you do this it will be unique and it would be good to mix and match the polishes you rarely use!


Have you tried water marble before? How did you find it? Let me know if/when you try it out, Id love to see your designs!!

Lots of love,

Wednesday, 25 January 2012

Nail Case Tidy-Up

Hello lovelies!

I spend alot of time trying to find certain items when Im doing my nails. Its abit of a nightmare, so I thought id have a little 'tidy up' with my nail case.

Below is a before image and as you can tell - I dont know where anything is!!


Lets start with organising some polishes. Here are my trusted brand of polish - Barry M!! As you can see, I dont have that many and some are duplicates. I am in need of some more and as soon as I see '3 for 2' in boots - Ill be stocking up!!!


Do you like my desk? I decorated it myself *proud*


Next is my small yet ever growing nails inc selection. I do adore the kelloggs red, its such a beautiful vibrant red. My next favourite is 'Special Effects' which I got for Christmas from a lovely friend. Its sooo sparkley!!


Right, this section consists of my 'art' pieces such as rinestones, stickers, gems, wraps, flowers and much more! Its still so tiny, so I need to buy more, more, more!


The next 2 sections were based on polishes and things I use the most...


Nail care section - includes buffers, toe seperators, hand/nail cream, cuticle cream, files, q tips etc


This is the final result!!


As you can see the middle compartment is still 'messy' but Ive made a seperator, so now I have nail polishes on one side and art pens on the other :)

I think my ever growing polish collection is soon going to mean that my nail case cant take anymore. *sob* Sooo, Im hoping to invest in a nail polish rack in the near future!!

Something similar to this;
want.need.want.need.
Have a jolly good day!
Lots of love,
Thursday, 19 January 2012

Nails Inc: Bow - Im the bling of the world!

Hello gorgeous readers and hello gorgeous polishes.....


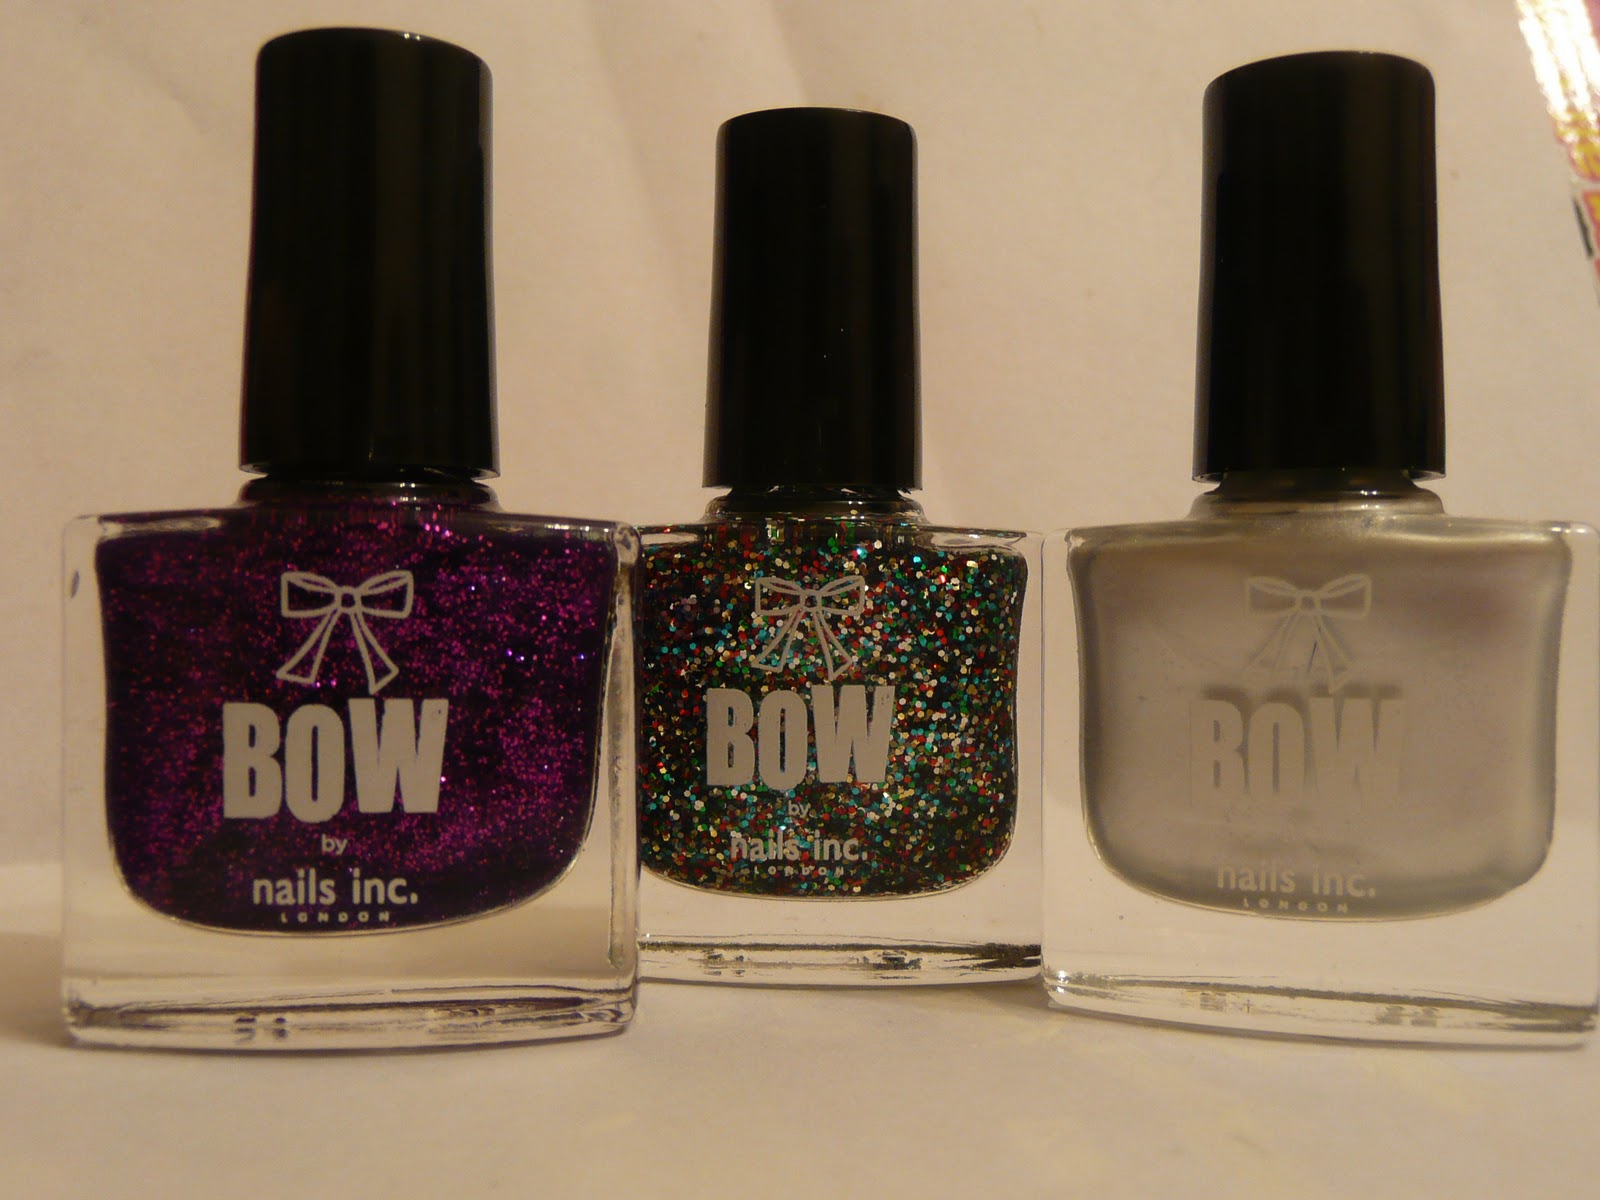
I saw this beautiful 3 piece polish set and had to snap it up straight away. Its 'Bow' by Nails inc. Ive never heard of Bow Wow before but apperently its exclusive to argos, a catalogue shop in the UK.  Its not reduced to £12.99 (438/6988) and this is the link clickity click.

Here are the 3 polishes with a little swatch;

Im bling of the world

Im blingin' in the rain

She's electric

I have to admit, I only bought this set because of 'Im bling of the world'. How gorgeous is that glitter? So many colours!!

I have managed to test 2 colours;


This was my least favourite colour, and I nearly never bought the pack because of it. Im so glad I changed my mind though! Once applied to the nails it looks so pretty and shiny.  Definatly happy I have this colour in my collection.
The polish itself is very watery but still seems to look thick enough. The above picture is taken with only one coat, so it cant be too bad, right?!

Ok, as much as I love this colour on its own, I just had to try out the glitter. Obviously.


Love, love, love!!!!!!!!!!!

What do you think of the colours? Have you tried any of the 'Bow' range? Just need to check out the sparkly purple, which Im sure will please me just like the rest.

My verdict on 'Bow' by nails inc - FABULOUS!!


Tuesday, 17 January 2012

Glitter Point - Nails Inc

Hello my lovelies!!
Today Im trying out afew of my Nails Inc polishes. As you all know my favourite brand of polish is and will probably always be Barry M - But a girls got to try others, right?
Ive selected a gorgeous deep red - Piccadilly Circus and an amazing special effects glitter - Electric Lane.


I didnt know what design to do, so I made it up as I went along. Not a good idea but I suppose its one way of experimenting!

After painting my nails all red, I added the glitter top coat to form a triangle point. This was easily created by using tape to make sure the lines were perfect. You need to use a medical tape and make sure your nails are completely dry before attatching it.


I added a little rinestone at the top of each point to create a focal point. Looking at my nails now, this would have been perfect for a Christmas Tree if done with green polish. This is something I shall try out nearer Christmas time!


Its so hard to photograph!


I apologise that my photos aren't that good. The polish is very shiny and it took ages for my camera to decide to focus on anything :(

My opinion on Nails Inc is that its pretty damn good. I adore the glitter top coat and know it will come in handy for so many designs. The polish glides on your nails easy and leaves a smooth texture, and as I said above its very shiny!
I think Nails Inc will be my second choice of polish and this is because Nails Inc costs around £11 a bottle, where as with Barry M they cost just £2.99! (and also because I am faithful to my first love and will always be haha)

Thats all from me today, I hope youve enjoyed reading! Please leave a quick comment below and if you're not following my blog (and why not!?!?!) then you can easily do this by heading to the top of the page on the right and clicking 'Join This Site'.